Rock landscaping has evolved beyond the austere xeriscapes of the 2000s. Today’s front yard rock installations combine function with genuine aesthetic appeal, offering homeowners a low-maintenance alternative to traditional lawns while adding texture, visual interest, and property value. Whether someone’s dealing with poor soil, limited water availability, or simply wants to reduce yard maintenance, rock landscaping delivers practical curb appeal. This guide walks through selecting materials, planning layouts, and executing an installation that’ll look sharp year after year, without the constant upkeep.
Key Takeaways
- Front yard rock landscaping eliminates mowing, fertilizing, and frequent watering while suppressing weeds and adding lasting curb appeal without ongoing maintenance.
- Pea gravel, crushed stone, river rock, and boulders each serve different design purposes—select materials based on budget, regional availability, and the aesthetic you want to achieve.
- Proper installation requires removing grass, laying landscape fabric, adding a compacted base layer, and installing clean edging to prevent rock migration and ensure a polished look for years.
- Calculate material volume carefully by measuring square footage and dividing by the coverage rate of your chosen rock to avoid shortages or waste.
- Seasonal maintenance includes raking leaves, pulling young weeds, and top-dressing thin areas annually—a small effort that keeps your rock installation looking sharp over time.
Why Rock Landscaping Works for Modern Front Yards
Rock landscaping solves real problems. Unlike grass, decorative rocks don’t need mowing, fertilizing, or frequent watering. In drier climates or regions with water restrictions, this matters, a lot. Rocks also stay put after installation: they don’t develop bare patches or brown in high-traffic areas the way turf does.
From a design standpoint, rocks create structure and focal points. A well-placed cluster of boulders draws the eye to an entryway. Uniform pea gravel or crushed stone provides a clean backdrop that makes foundation plantings or hardscape features pop. Rocks also suppress weeds when installed over landscape fabric, cutting down on herbicide use and hand-pulling.
There’s a financial angle too. Initial installation costs run higher than seeding a lawn, but over five to ten years, the savings in water bills, fertilizer, equipment, and yard labor add up. Many homeowners see it as a one-time investment that pays dividends in curb appeal and free time.
Choosing the Right Rocks and Stones for Your Design
Not all rocks serve the same purpose or fit every aesthetic. The choice depends on budget, regional availability, climate, and the overall look someone wants to achieve.
Popular Rock Types and Their Benefits
Pea Gravel is a top choice for fill and pathways. These smooth, rounded stones (typically ½ to ¾ inch) are comfortable underfoot, relatively inexpensive, and available in warm earth tones or cool grays. A cubic yard covers roughly 100 square feet at 3 inches deep, a practical baseline for estimating material.
Crushed Stone or Crushed Granite offers more angular edges, giving a tidier, more structured appearance than pea gravel. It compacts better and holds its place in heavy foot traffic or on slopes. Granite fragments also weather beautifully over time, developing a silvery patina.
River Rock (larger, water-worn stones) works well as accents, edging, or in designated planting areas. These are visually striking but pricey: use them strategically rather than as bulk fill.
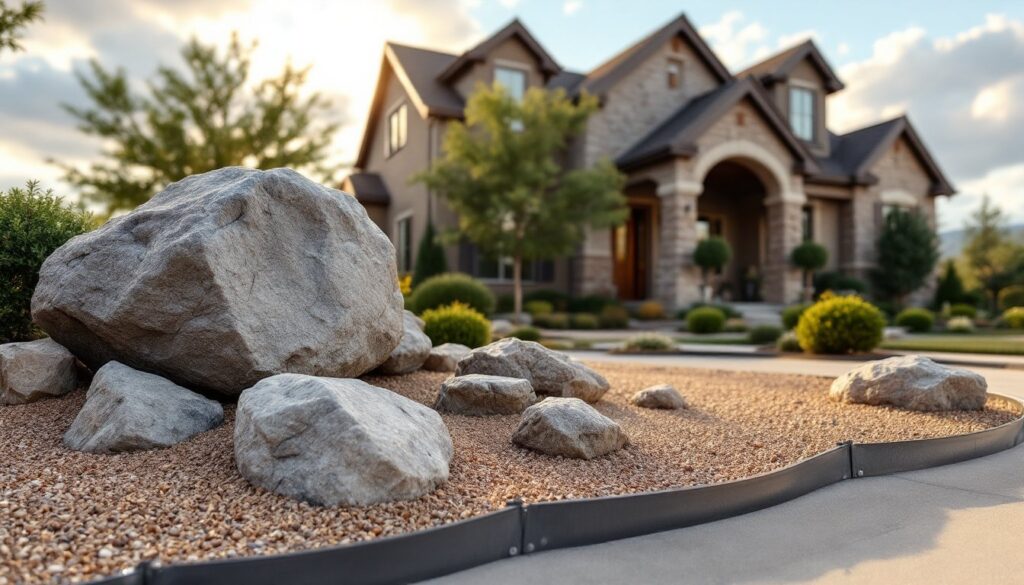
Boulders and Flagstones anchor a design. A 2- to 3-ton boulder placed near an entry makes an immediate visual statement. Flagstones suit pathways and create formal definition. Both require proper placement and sometimes equipment to set safely.
Recycled Asphalt or Quarry Process is budget-friendly and compacts firmly, ideal for driveways or base layers beneath decorative rock. It’s not pretty on its own but does functional work.
When selecting rock, check local quarries or landscape suppliers, shipping costs can double the price of material from distant sources. Compare per-ton or per-cubic-yard pricing. Also verify the source: some regions have excellent native stone that ties into the local landscape character.
Planning Your Rock Landscaping Layout
Good design starts with a plan on paper (or in a photo-editing app). Look at the front yard’s shape, slope, sun exposure, and existing features, the house foundation, driveway, entryway, and any trees or shrubs.
Identify focal points. A large boulder, a specimen plant, or a textured plant grouping should anchor the composition. Avoid plunking rocks uniformly across the yard: clusters feel more intentional. Odd numbers (one large boulder, three medium groupings) read better visually than pairs.
Consider practical zones. High-traffic paths need stable, compacted base stone. Planting beds around the house might use pea gravel with occasional larger rocks. The edges of the front yard can transition to river rock or decorative mulch.
Measure the area to calculate material volume. Measure length and width in feet, then divide the square footage by the coverage per cubic yard of your chosen material. For pea gravel at 3 inches deep, divide square footage by 100. For 2 inches deep, divide by 150. This prevents both shortage and excess waste.
Don’t forget edging. A clean edge, metal, stone, or timber, between rock areas and lawn or planting beds looks intentional and prevents rock creep into grass. This is one place where a few dollars spent upfront saves hours of maintenance later.
Installation and Maintenance Tips
Installation is mostly grunt work, not skill work, but doing it right prevents headaches.
Start by removing or killing existing grass. Apply herbicide (like glyphosate, following label directions), or strip sod if the area is small. Wait a week or two for grass to fully die. Next, rake and level the ground, removing debris and large roots. Fill depressions with soil and compact lightly. This base matters, lumpy ground will show through rocks and create pooling during rain.
Lay landscape fabric over the prepared ground. This barrier blocks weeds without preventing water or air penetration (a critical difference from plastic sheeting). Overlap seams by 6 inches and pin with landscape staples every 3 to 4 feet. For larger areas, this step saves years of weeding.
If installing edging, do it now, before the rock. Metal or composite edging runs a few dollars per linear foot and defines the space crisply. Secure it firmly: loose edges catch feet and look sloppy after a season.
Spread base stone first if using a two-layer approach (common for cost-efficiency). Spread and rake 2 inches of quarry process or crushed stone, then compact it lightly with a hand tamper or the sole of a boot. This firm base prevents pea gravel or decorative stone from sinking unevenly.
Add decorative rock on top, raking to 2 to 3 inches depth. Leave slightly more coverage in foot-traffic zones. In planting beds, keep rock an inch or two back from plant stems to prevent stem rot and pest harborage.
For large boulders or flagstones, position them before spreading finer rock. A hand truck or small equipment rental (like a 1-ton dump truck or compact skid-steer) saves backs and shins. Set boulders firmly, adjusting base soil if needed so they don’t tip or settle unevenly.
Keeping Your Rock Yard Looking Fresh
Rock requires less fussing than grass, but not zero maintenance. Blow or rake out leaves and debris seasonally, especially in fall. A leaf blower on low speed clears surfaces without scattering smaller pea gravel.
Weeds do pop through, even though fabric. Pull by hand when young (roots come out easier). Spray emergent weeds with a contact herbicide if the area is large. Avoid broad-spectrum products near plants unless you’re okay with collateral damage.
Rock gradually settles and shifts, especially in the first year or two. Top-dress thin areas with fresh material annually, it’s cheap compared to the original install. Keep edging tight to prevent rock migration into the lawn.
In regions with winter snow, avoid rock salt directly on decorative stone if possible: salt can discolor or damage softer rock types like limestone. Use alternative de-icers like magnesium chloride or sand. Check product labels for landscape compatibility.
Over time, pea gravel may compact, and dust can mix into it, darkening the appearance. Raking occasionally refreshes the look without major expense. Some homeowners refresh the top layer every 3 to 5 years, budget around $50 to $150 depending on area size.
Conclusion
Rock landscaping isn’t a set-it-and-forget-it cure for yard maintenance, but it’s genuinely close. With thoughtful material selection, solid planning, and a day or two of installation work, homeowners get a durable, attractive front yard that holds up to weather, foot traffic, and years of minimal upkeep. The key is starting with good prep and honest edging, cut those corners, and the project starts looking rough within a season. Done right, it’s one of the smartest curb appeal investments a home can get.