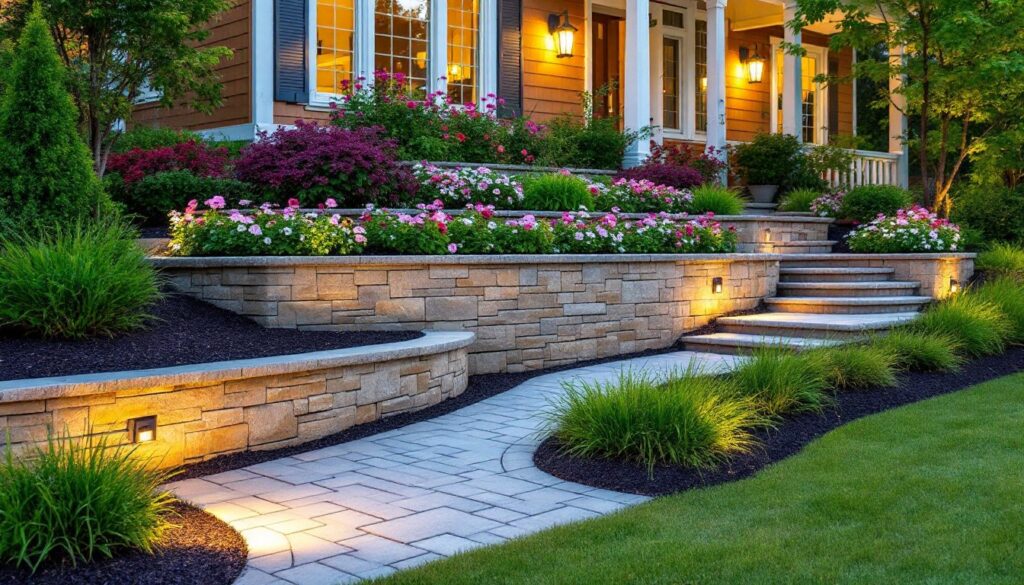
A front yard retaining wall does more than hold back soil, it’s a canvas for landscaping that catches the eye the moment someone pulls into the driveway. Whether dealing with a sloped lot or simply wanting to add dimension to a flat yard, retaining walls create structure and opportunity. The key is matching the wall’s design with plantings that complement its materials and reinforce the home’s aesthetic. This guide covers seven proven approaches to retaining wall landscaping that balance beauty, function, and realistic DIY execution. From tiered gardens spilling with color to minimalist designs that emphasize clean lines, each method trades off maintenance, cost, and installation complexity differently.
Key Takeaways
- Front yard retaining wall landscaping transforms a structural feature into a focal point by pairing wall materials with complementary plantings that enhance your home’s curb appeal.
- Tiered garden beds with cascading plants work best on sloped lots, requiring proper drainage with 6-inch gravel backfill and landscape fabric to prevent soil erosion.
- Minimalist retaining wall designs using one strong material and 2-3 plant species create visual rhythm with less maintenance, making them ideal for homeowners seeking low-upkeep solutions.
- Native plants paired with natural stone retaining walls create authentic, low-maintenance landscapes that require less water and fertilizer while supporting regional character.
- Integrate pathways, stairs, and lighting with your retaining wall to create a unified hardscape that guides foot traffic safely and frames your home’s entry.
- Water features and LED uplighting extend the visual appeal of a retaining wall into evening hours while improving safety and attracting wildlife to your landscaping.
Tiered Garden Beds With Cascading Plants
Tiered retaining walls create natural shelves for staggered planting, turning a slope into a lush focal point. This approach works especially well on lots with existing 4- to 6-foot elevation changes or where the homeowner wants to soften a single tall wall with multiple shorter sections.
The strategy is straightforward: build or use existing walls at different heights, then fill each level with complementary plants. Ground covers, creeping sedums, creeping phlox, or trailing petunias, spill naturally over the edges, disguising the wall’s hard lines. Taller shrubs or small ornamental trees occupy the upper tiers, providing height and screening.
Material choice matters here. Timber walls (pressure-treated 6×6 or 8×8 timbers) age gracefully and suit cottage gardens, while stacked stone works for Mediterranean or transitional styles. Installation requires proper drainage behind each wall (6-inch gravel backfill minimum) and landscape fabric to prevent soil washout. If the wall system exceeds 4 feet or spans a property line, check local building codes, some jurisdictions require permits and engineered designs for taller structures.
Maintenance includes seasonal pruning, deadheading to extend bloom, and refreshing mulch annually. Watering is more frequent on tiered systems because water drains faster through stacked soil levels: drip irrigation can cut this chore significantly.
Modern Minimalist Retaining Walls
Clean lines and restrained plant palettes define minimalist retaining wall landscaping, appealing to homeowners who prefer subtlety over exuberance. This look hinges on two principles: one strong material choice and a limited plant species list.
Poured concrete walls, treated board-form walls, or stacked steel planters are ideal backdrops. The key is letting the wall’s texture and color do the talking. Pair with two or three plant types maximum, perhaps ornamental grasses like fountain grass, clumping sedge, or feather reed grass, plus a single shrub variety such as dwarf conifer or boxwood. Repetition (planting the same species in groups of three or five) creates visual rhythm without chaos.
A single specimen tree, a Japanese maple, crabapple, or Zelkova, positioned off-center adds focal interest without clutter. Groundcover plantings are minimal: instead, use mulch (shredded bark or stone) as a design element, raked into geometric patterns or left clean and simple.
This style requires less frequent deadheading and pruning because fewer plants mean fewer maintenance tasks. Watering is straightforward: drip lines to the shrubs, occasional soaking for the grasses. Cost is moderate if using precast concrete panels: custom poured walls run higher but offer flexibility in height and color.
Natural Stone and Native Plants
Stacked natural stone, fieldstone, slate, or cut ashlar, paired with native plants creates a cohesive, low-maintenance landscape that suits regional character. Native species have evolved to thrive in local soil and climate, requiring less water, fertilizer, and pest management once established.
The aesthetic is earthy and authentic, especially effective in areas with rocky or forested contexts. Blue stone or granite work in cooler climates: limestone or sandstone suit warmer regions. Install with 2-3 inches of mortar (lime-based for traditional aesthetics) or dry-stack for a rustic feel. Dry stacking is faster and easier for DIYers but less stable on steep grades or in freeze-thaw climates where soil movement can shift the stones over time.
Plant selection depends on region. In the Northeast, native coneflowers, black-eyed Susans, and asters thrive. The Southeast calls for native ferns, native azaleas, and witch hazel. West Coast gardens benefit from California poppies, sage, and manzanita. Check a native plant society or cooperative extension office for species suited to your hardiness zone and moisture conditions.
Native plantings take 2-3 years to mature but then stabilize, requiring mainly seasonal cleanup and light deadheading. Mulching with shredded leaves or bark mimics forest floors and conserves moisture. Cost is moderate to low since native plants, once established, rarely need replacement.
Hardscape Integration and Pathways
Retaining walls aren’t islands, they function best as part of a larger hardscape scheme that guides foot traffic and frames the home’s entry. Integrating pathways, steps, and adjacent patios with the wall creates a unified landscape rather than a scattered collection of features.
Creating Functional Entry Points
A path leading from the driveway or street to the front door should connect visually and physically to the retaining wall. Use matching materials: if the wall is stone, lay a stone pathway parallel to it or step up the grade with stone stairs. Concrete pavers (12×24 inches or 18×18 inches) offer clean lines and work well with modern walls. Gravel or mulch paths suit rustic, cottage aesthetics but require annual raking and top-ups.
Stairs or terraced steps are essential if the wall creates more than a 12-18 inch grade change. Tread depth (the horizontal run) should be 12-15 inches: risers (vertical height) should stay between 6-7 inches, steeper steps feel awkward and unsafe. Local building codes often specify stair geometry, especially for public-facing areas. Risers over 7.75 inches or treads under 10 inches are common code violations.
Planting at the base of pathways softens hard edges. Perennials spilling slightly onto gravel or pavers create a lived-in feel without obstructing movement. Small ornamental grasses or low shrubs (12-18 inches tall) flanking the path are ideal: avoid plants that grow thick and block sightlines to the home or street.
Lighting and Water Features
Nighttime illumination transforms a retaining wall from daytime backdrop to focal point. LED uplighting mounted low and angled toward plants or stonework creates drama and extends the visual interest into evening hours. Brass or stainless steel fixtures last longest: cheap plastic lights fade and fail within two seasons.
Path lighting (6-12 inches tall) along adjacent walkways improves safety while drawing the eye upward toward the wall and plantings. Solar options are cheaper and simpler (no trenching for electrical) but deliver dimmer output and shorter lifespan, they suit supplemental accent lighting rather than primary illumination.
Water features, a small recirculating fountain, a rill (shallow water channel) running parallel to the wall, or a rain garden basin, add movement and sound while managing stormwater runoff. A simple wall-mounted fountain (a face or spout pushing water into a stone or metal basin) is achievable for a confident DIYer and costs $200-600 installed. More complex water features (koi ponds, streams) require professional design and electrical work.
Water features attract birds and pollinators, boosting wildlife appeal. Maintain proper water depth and circulation to prevent mosquito breeding: most systems benefit from a small pump and regular cleaning. Winter shutdown is needed in freezing climates to prevent pump damage.
Conclusion
A front yard retaining wall is a structural investment that pays dividends when paired with thoughtful planting and hardscape design. Success depends on matching the wall material and style to the home’s architecture, choosing plants suited to the site’s sunlight and drainage, and integrating pathways or features that tie everything together. Start with realistic assessment of maintenance tolerance, tiered gardens demand more seasonal attention than minimalist designs, but the payoff in curb appeal is undeniable. With proper drainage, a bit of patience, and honest conversation about DIY limits versus professional help, a retaining wall landscape becomes a point of pride.