A backyard fire pit transforms an outdoor space into a gathering place, whether it’s for roasting marshmallows on a Friday night or hosting friends on a cool autumn evening. The good news: building one doesn’t require a contractor or months of planning. Homeowners can choose from several proven designs that range from simple afternoon projects to weekend builds. This guide walks through eight landscaping-friendly DIY backyard fire pit ideas, covering materials, construction methods, and design principles to fit different budgets and skill levels. From stone rings to sunken seating areas to elevated metal bowls, there’s a fire pit style for nearly every yard.
Key Takeaways
- DIY backyard fire pit ideas range from simple stone rings to complex sunken seating areas, allowing homeowners to choose based on budget, skill level, and available space.
- Above-ground fire pits require no digging or permits and are portable, while in-ground pits offer a more integrated, permanent look but demand proper permits, setbacks from structures (10–15 feet minimum), and soil preparation.
- A classic circular stone or brick ring is the most forgiving backyard fire pit design, requiring only fire-rated materials, landscape fabric, and dry-stacking or mortar application without professional contractor help.
- Elevated metal fire bowls provide a modern alternative that skips excavation entirely, costs $200–$600, and sits 18–36 inches high for easier airflow management and spark control.
- Thoughtful hardscaping and low-voltage landscape lighting transform a fire pit into a destination gathering space, using path lights, pavers, edging, and plantings to define the zone and extend usable evening hours.
- Local fire codes must be checked before building any backyard fire pit, as most jurisdictions require minimum setbacks from structures and trees, and sunken pits typically need building permits and inspections.
Choose Your Fire Pit Style and Materials
Above-Ground vs. In-Ground Options
The first decision is whether to build up or dig down. Above-ground fire pits sit on the surface and are easiest to install, no digging, no permits required in most jurisdictions. They’re also portable and reversible, making them ideal for renters or those testing the waters. The tradeoff: they take up visual space and can look less integrated into the landscape.
In-ground or sunken pits feel more permanent and built-in. They recede into the yard, freeing up sightlines and creating a natural gathering bowl. Digging deeper means more prep work and, in some areas, a fire pit permit or inspection by the local building department. Check local fire codes before starting, many jurisdictions require minimum setbacks from structures (typically 10–15 feet) and above-ground clearance from trees.
Other material considerations: stone or brick radiates heat beautifully and weathers well for decades but demands precision fitting and mortar work. Metal liners and rings cost less, install faster, and last 5–10 years with proper maintenance. Pre-made fire bowls in steel or cast iron skip the masonry entirely. Each approach trades durability, aesthetics, and labor differently.
Create a Circular Stone or Brick Ring
This is the classic backyard fire pit, and for good reason. A simple ring of stacked stone or brick is forgiving to build, looks polished, and works with any landscape style.
Materials needed:
- Pavers or fire bricks (12–16 inches deep: about 40–60 pieces for a 4-foot-diameter ring)
- Landscape fabric (to prevent grass creep)
- Grate or fire ring (optional, keeps logs contained)
- Metal fire ring insert (6–10 inches tall, keeps bricks from tumbling inward)
Basic steps:
- Mark a circle 4–5 feet in diameter using a rope and chalk.
- Remove grass and topsoil to a depth of 6–8 inches.
- Tamp the soil firm and lay landscape fabric.
- Stack fire-rated bricks or stone, not regular house bricks, which can crack and pop from heat.
- Dry-stack (no mortar) for a removable pit, or use fire-rated mortar for permanent installation.
- Leave a 2–3 inch opening on one side for airflow.
Fire safety tip: keep a shovel and water source nearby, and never leave a lit fire unattended. The pit’s interior should sit at least 12–18 inches above ground to keep moisture out and airflow steady.
Design a Sunken Fire Pit Seating Area
A sunken pit with built-in seating is the showstopper design, and more achievable than it looks. The pit sits below grade, and benches ring the edge, creating an intimate gathering spot.
What’s involved:
- Dig a 2–3 foot deep hole, 6–8 feet in diameter.
- Compact the base and lay a gravel bed (4–6 inches) for drainage.
- Line the pit walls with fire bricks or stone to prevent collapse.
- Build bench seating around the rim using landscape-grade timber (composite or treated 2x12s) and posts set into concrete footings 3 feet deep (below the frost line for your region).
- Cap the benches with a finished seat board and back brace for comfort.
This design requires more digging and foundation work, so assess soil type first. Dense clay holds walls better than sandy soil, which may need retaining walls or reinforcement. You’ll likely need a building permit for a permanent sunken structure, and an inspection before backfilling. The payoff: a fire pit that feels intentional, sheltered from wind, and built to last decades.
Landscape integration: Plant low shrubs around the perimeter, add gravel pathways, and consider subtle landscape lighting to highlight the seating area at dusk.
Build Elevated Metal Fire Bowls
For a modern look with minimal digging, a raised metal fire bowl or outdoor fire table is the answer. These pedestal-mounted steel or cast-iron vessels sit 18–36 inches high, clear of the ground.
Advantages:
- No excavation or ground prep.
- Easier to manage airflow and contain sparks.
- Doubles as a focal point or small table.
- Typically costs $200–$600, depending on size and material.
Installation basics:
- Choose a flat, level spot away from wind and overhanging branches.
- Set the base on a concrete pad (4 inches thick, minimum 3 feet square) or tamped gravel for stability.
- Assemble according to manufacturer instructions, most bolt together in under an hour.
- Add a fire ring insert if the bowl isn’t designed for direct fire.
- Surround the base with pavers or landscape edging to define the zone and prevent tripping.
Materials to have on hand:
- Eye protection and work gloves.
- A level (essential, off-kilter bowls tip or allow water pooling).
- Concrete mix and a shovel if building a pad.
- Landscape fabric and pavers for the surround.
These bowls work well on decks or patios, though always confirm deck load capacity first (a full fire bowl can weigh 100–150 pounds). Metal rusts over time, so treat with a rust inhibitor each season or cover the bowl when not in use.
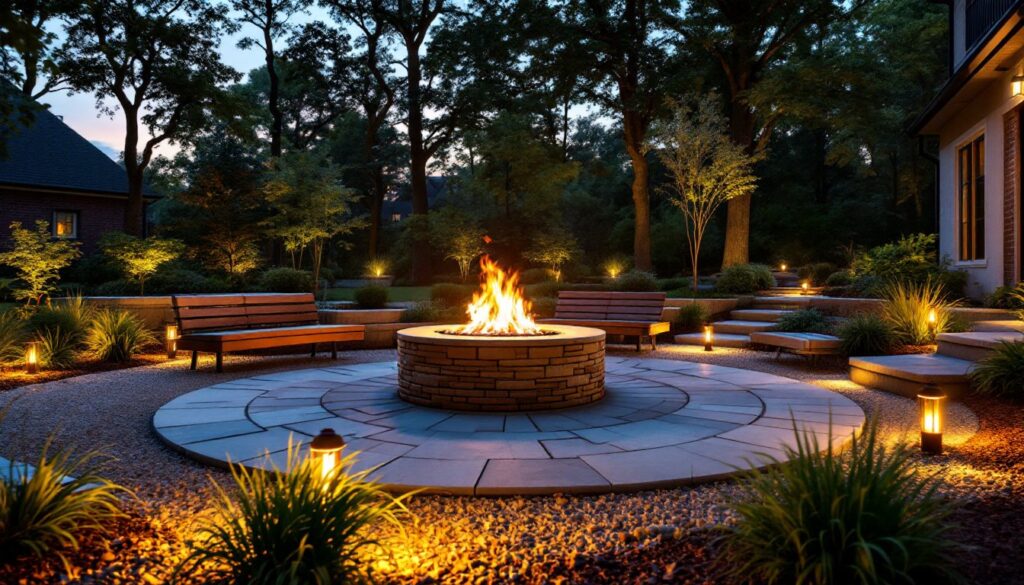
Incorporate Landscape Lighting and Hardscaping
A fire pit is beautiful on its own, but thoughtful landscaping multiplies its impact and functionality. Landscape lighting extends usable hours and highlights the fire pit as a nighttime destination.
Lighting strategies:
- Path lights along approach routes, 8–12 inches tall, spaced 4–6 feet apart.
- Uplighting behind the seating area to add depth and shadow contrast.
- Soft accent lights aimed at plantings or hardscape features (use warm white or amber LEDs to match firelight).
Hardscaping to anchor the space:
- Lay a paver patio or gravel surround 8–12 feet from the fire pit to define the gathering zone.
- Install landscape edging (steel, composite, or stone) to separate lawn from mulch beds.
- Add stepping stones between the house and pit for safe, defined foot traffic.
- Plant low-growing shrubs (ornamental grasses, sedums, or junipers) around the perimeter to soften hard edges and provide wind breaks.
Material note: choose slip-resistant pavers and avoid anything that flakes or weathers quickly. Gravel (pea or decomposed granite) looks natural and handles foot traffic well, but rake it seasonally and add fresh material every 2–3 years.
Wiring tip: low-voltage landscape lighting (typically 12V) is safest for DIY installation, no electrician needed, and costs pennies to run. Bury cables 6 inches deep or run them along paver edges. Test the system before burying anything.
Conclusion
Building a backyard fire pit is an achievable weekend or two-weekend project that pays dividends in years of gatherings and ambiance. Start with your available space, local codes, and honest skill assessment: a simple stone ring is forgiving, while a sunken seating area demands more precision and permits. Choose materials that match your budget and climate, prep surfaces carefully, and don’t skip the landscaping finishes, a well-lit, defined hardscape turns a fire pit from a backyard feature into a destination. Whether it’s stone, brick, or metal, the pit you build now will anchor your outdoor living space for seasons to come.