A dry creek bed brings natural beauty and practical drainage to a front yard without the ongoing maintenance of a living garden. It mimics how water flows through a landscape during rain, channels moisture away from the foundation, and creates visual interest year-round. Unlike traditional landscaping, a dry creek requires no irrigation, fertilizer, or seasonal replanting, just thoughtful design and solid installation. Whether someone has a sloping yard, poor drainage, or simply wants low-maintenance curb appeal, a dry creek bed delivers both function and aesthetic value. This guide walks through every step: planning the route, selecting stones and plants, and installing a dry creek that works hard and looks great.
Key Takeaways
- A dry creek bed landscaping solution manages rainwater drainage while requiring zero irrigation, fertilizer, or seasonal replanting, making it ideal for low-maintenance front yards.
- Proper material layering—landscape fabric, 2–3 inches of pea gravel, and 1–3 inch river rocks plus focal boulders—ensures both visual appeal and functional water flow.
- Strategic plant placement with drought-tolerant species like ornamental grasses, ground covers, and shade-tolerant shrubs softens the creek while preventing bank erosion and soil instability.
- Installation involves 7 straightforward steps: site preparation, fabric laying, gravel spreading, boulder placement, rock arrangement, planting, and final adjustments—completing most projects in one to two weekends.
- Minimal ongoing maintenance—annual leaf and silt raking, occasional rock top-dressing, and light plant trimming—keeps a dry creek looking natural and functioning effectively for years.
What Is a Dry Creek Bed and Why It Works for Front Yards
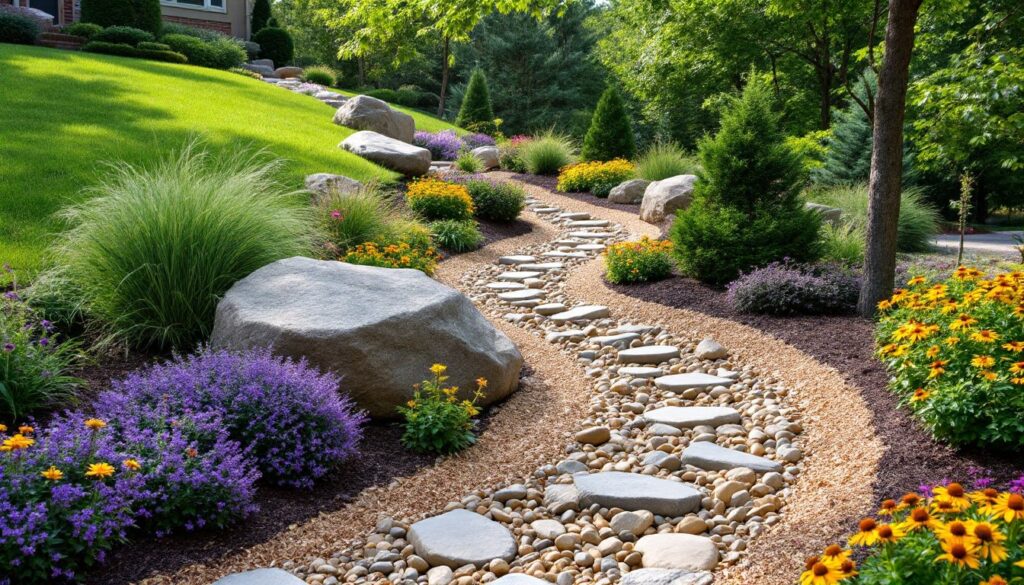
A dry creek bed is a landscaped channel filled with gravel, river rocks, and boulders that mimics a natural streambed. It carries water downhill during rain, directing runoff away from the house and garden beds while remaining dry most of the year. The visual effect is striking, it looks like a permanent stream frozen in place.
For front yards, dry creek beds solve real problems. Homes on slopes often shed water too fast, eroding soil and creating bare patches. A dry creek slows that flow, allowing moisture to permeate the ground rather than running off unused. It also softens hardscaping: a creek bed breaks up a flat, blank yard and creates depth without the cost or labor of regrading.
Beyond function, a dry creek works in any climate. In the Southwest, it fits the landscape naturally. In humid regions, it stands out as an intentional design feature. It’s drought-resistant by definition, no watering bills, and pairs well with perennials, ornamental grasses, and shade-loving shrubs.
Planning Your Dry Creek Bed Layout
Start by observing how water actually moves through the yard during rain. Walk the property after a storm and note where water pools, runs fast, or erodes soil. A dry creek should follow that natural path, typically from a high point (roof drainage, uphill slope) to a lower one (storm drain, lower yard boundary, or rain garden).
Measure the length and width. Most residential dry creeks run 15–40 feet long and 2–4 feet wide, though this varies by lot size. Sketch the route on paper or use chalk to outline it on the ground. A gentle S-curve or meandering path looks more natural than a straight line, even on small yards.
Consider plantings and hardscaping nearby. Does the dry creek tie into a patio, driveway, or mailbox? Will plants overhang it or frame it? A successful layout feels intentional, not like an accident. Check local codes: some jurisdictions regulate drainage and earthwork. If the creek requires excavation deeper than 12–18 inches, call before digging to locate buried utilities.
Choosing Materials and Rocks
Rock selection makes or breaks the look. Use river rocks or smooth landscape stones (1–3 inches) as the base and visible upper layer. These are rounded by water, naturalistic, and comfortable to walk on if needed. Avoid sharp-edged crushed stone: it’s industrial and unstable underfoot.
Layer materials strategically. Beneath the visible rocks, lay landscape fabric to suppress weeds and prevent river rocks from sinking into soil. On top of the fabric, spread a 2–3 inch base layer of pea gravel, smaller, smoother stones that compact and won’t roll as easily as larger river rocks.
Add visual interest with focal boulders. Select 1–3 large stones (12–36 inches across) and position them where the creek narrows, bends, or approaches plants. These anchor the design and slow perceived water movement.
Budget roughly 100–150 river rocks and boulders per 20 linear feet of creek bed, depending on the width and depth. Prices vary by region and material grade: local landscape suppliers often beat big-box stores on quality and delivery. River rocks run $0.50–$2 per pound: boulders are priced individually. Landscape fabric costs $0.10–$0.20 per square foot.
Selecting Plants and Ground Cover
Plants soften the creek bed and tie it to the broader landscape. Choose tough, drought-tolerant species that handle occasional water flow and don’t mind periodic moisture fluctuation.
Best plant choices include:
- Ornamental grasses (fountain grass, feather reed grass, switchgrass): arch gracefully, add movement, require minimal water once established.
- Creeping ground covers (creeping phlox, sedum, ajuga): fill edges, prevent erosion, and look naturalistic along the bank.
- Ferns (lady fern, autumn fern): thrive in part shade, enjoy moisture retention, bring texture to dense plantings.
- Shade-tolerant shrubs (serviceberry, dwarf conifers, viburnum): frame the creek, provide year-round structure, and don’t compete for water.
- Perennials (coneflower, black-eyed Susan, daylily): add seasonal color without fussiness.
Avoid plants with shallow, spreading roots that destabilize banks or demand constant irrigation. Plant on the sides and top of the creek edges, not directly in the channel. During rain, water will still reach them: in dry months, they’ll rely on deep soil moisture, not creek flow.
Space plants wider than you think necessary, they’ll fill in within 2–3 seasons. Overplanting now looks good but creates crowding and disease pressure later.
Installation Steps and Best Practices
Step 1: Prepare the site. Clear vegetation, debris, and topsoil from the planned creek path using a shovel or small excavator for long runs. Aim for a 2–6 inch depression: the deeper the cut, the more dramatic and functional the channel. Tamp the soil base with a hand tamper or plate compactor to prevent settling later.
Step 2: Lay landscape fabric. Unroll landscape fabric (4–6 mil thickness) along the entire channel bottom and sides. Overlap seams by 6 inches. Secure edges with landscape staples or rocks. This prevents river rocks from disappearing into soil and blocks weed growth from below.
Step 3: Spread the base layer. Distribute pea gravel 2–3 inches deep across the fabric. Rake level and compact gently with the back of a rake or light tamping.
Step 4: Position focal boulders. Place large stones at key points, bends, narrowing sections, or near plant groupings. They should sit stable and partially sink into the gravel.
Step 5: Add river rocks. Scatter smooth river rocks (1–3 inches) across the pea gravel base in a natural, random pattern. Don’t arrange them in neat rows, water doesn’t flow in perfect lines. Vary the spacing and create depth by using slightly larger stones along the edges.
Step 6: Plant the banks. Install plants along the sides and top edges in groupings of 3 or 5 for visual impact. Space them according to mature width. Add 2–3 inches of mulch around plants (not touching stems) to retain moisture during establishment.
Step 7: Final adjustments. Step back, observe from multiple angles, and adjust rock placement or plant position as needed. A gentle slope toward the downhill end matters: ensure water won’t pool or create a dam.
Maintenance and Long-Term Care
Once installed, a dry creek requires minimal upkeep, that’s the whole point.
Year one care: Water newly planted shrubs and ground covers weekly for the first 4–6 weeks, then reduce to every 10–14 days through the growing season. Weed hand-pull any volunteers emerging through the landscape fabric. Rake rocks smooth after heavy rain to remove debris and reset the visual line.
Ongoing maintenance: Every 1–2 years, rake out accumulated leaves, twigs, and silt. Top-dress the creek bed with new river rocks if the original layer compacts or fades. Refresh plant mulch in spring. Trim grasses and perennials in late winter or early spring. Most shrubs need little pruning beyond removing dead wood.
Problem-solving: If the creek bed erodes during heavy rain, consider adding larger boulders to slow flow or extending landscape fabric up the banks. If weeds appear even though fabric, spot-spray with a herbicide safe for landscape use or pull by hand: hand-pulling is slow but safest near plants. If plants struggle, check drainage and sunlight: adjust plantings accordingly.
The biggest maintenance mistake is overthinking it. A dry creek is supposed to look natural, not manicured. A few leaves and minor seasonal settling are normal.
Conclusion
A dry creek bed transforms a front yard from bland and wet to beautiful and functional. It manages rainwater, eliminates maintenance headaches, and creates natural visual flow that ties a home to its landscape. With careful planning, thoughtful rock and plant selection, and solid installation, any homeowner can build one in a weekend or two. The result is a landscape feature that works harder than it looks, exactly what practical front-yard design should do.